I’m relatively new to art appreciation. A big turning point for me was a few years back when I read John Milton’s Paradise Lost. Since then, my appreciation for art and the artists behind the work has continued to grow. I even have some Peter Max limited edition prints hanging on my walls.
I’m a huge fan of fantasy art and pretty much any game art coming out of TSR in the 1980s. There is something about the oil on canvas, seeing the stroke of the brush—which for me sort of elevates the work. I’m not complaining about the perfection found in digital painting—just that I like the “handmade” quality brush strokes bring.
Archmage Rises is a love letter to tabletop role-playing games. The art style is ’80s TSR for the modern area.

Seriously awesome!
I can’t afford to hire Larry Elmore, Todd Lockwood, or Keith Parkinson. So to recruit artists, I went through hundreds of fantasy art portfolios on Deviant Art. Of those, I contacted many. Of those, I worked with three. Rogier van de Beek’s style was (by far) my favorite.
So this week, we’re going behind the scenes with Rogier on how he does freelance indie game art. Take it away, Rogier!
Rogier van de Beek:
Whether for concepts, game art, or promotional purposes, you’re going to need someone to create the art. Visual representation is the easiest way to set a mood or tell a story after all, since human beings are highly visual.
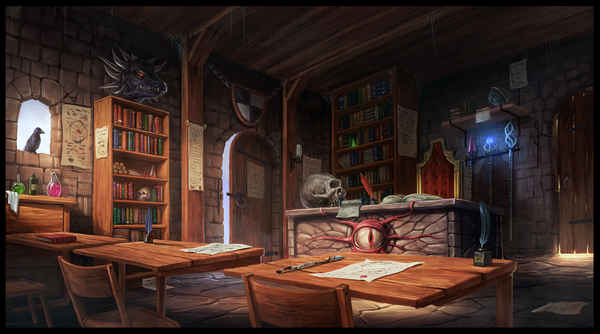
Although Archmage Rises is heavy on storytelling, art is still needed to set the tone or mood. This is where I come in. My name is Rogier van de Beek, a freelance concept artist and illustrator from the Netherlands. I’ve worked with Thomas for the past seven months on Archmage Rises, and I have to say that it’s been a total blast. But enough talk: Let’s take a deep dive into the piece, “The Mage Classroom.”
First off, every artist out there has a unique own way of working. As they say, there is more than one road that leads to Rome. So the first lesson is to follow the one you are most comfortable with!
The goal for this image was to create a classroom where a mage teacher imparts his or her knowledge. Someone who is talented, but not overly powerful or special. It is a pivotal point in the character creation process. The room is owned by someone who knows a lot about magic and teaches the children their foundational knowledge.
The first step is always to discuss the image idea with Thomas. Maybe he has something specific in mind like a certain type of chair, or monster skull on the wall. Other times, it’s just a certain emotionthe image must evoke. I then ask him to provide me with several reference images. Having the client provide reference material eliminates a lot of guesswork and makes me feel more confident about the task.
Thomas Henshell:
Finding reference images takes forever! As a programmer, designer and writer, I don’t really know what I want other than “I want it to be awesome!” Isn’t that enough direction? 🙂 Finding reference images helps me narrow down the ideas into something more concrete—something that both of us can understand, point at, and discuss. So I definitely see the value of spending hours finding the right references.
Rogier:
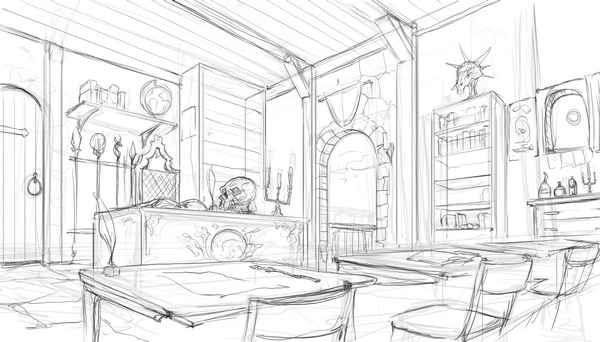
After the initial discussion, I look through the provided references but also find my own. I’m looking for a way to capture all the important ideas in a single image. Then it’s time to start sketching!
I start by exploring the composition of the image. Camera angle is super important, for example. I don’t create a list of objects or anything, I just imagine what I would see if I was standing (or sitting) in that location. Then I move into what would be the most interesting way to display all the elements in the image. Like the large chair of the teacher. The giant desk. The magical staffs and the bookshelves. It needs to feel like a real classroom.
After doing some sketchbook work and exploring the idea, I finally have something I can use. It’s time to switch to the tablet in order to be able to sketch it up digitally—and then send it off to Thomas and find out what he thinks.
Thomas:
This is the most exciting and scary part for me. It’s exciting to see a game scene I’ve only thought about or written some dialogue for suddenly come to life right before my eyes. At this stage, I pounce on any email coming from Rogier so that I can see what he’s done.
It is also scary because if the sketch is completely wrong, it means I haven’t done a good job of communicating the vision of what is needed. A wrong sketch means lots of time has to be spent finding better reference images, writing more documentation, and having more meetings. So everyone is happier if I just approve the sketch.
Finally, as a non-artist, I sometimes have a hard time knowing how to evaluate a sketch. The door in the sketch isn’t open, but it is in the final. The monster head on top of the bookshelf isn’t as large as it is in the final. A sketch is like Act 1 and 2 of a story. Its up to my imagination what Act 3 will look like, and my Act 3 may be different from Rogier’s. I usually will approve a sketch without changes. If we have totally different visions for the picture, it will show up at the next milestone.
Rogier
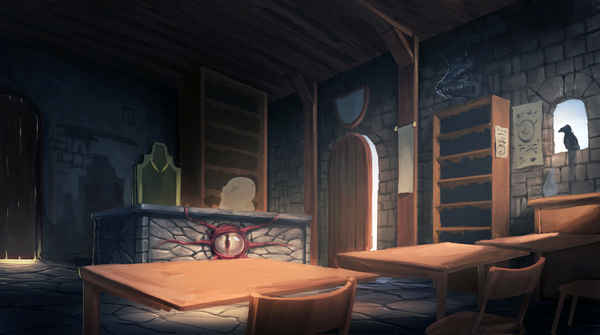
When Thomas approves the sketch, it’s time to start painting it up. Sometimes this can be very intimidating! What looks great as a sketch may not look great as a painting… You have the lines, you have a picture in your head, you have a feeling this picture will be really cool when it’s done. But until it’s done, the first steps of painting it up will be horrible! Especially when you start going over your sketch and finding all the mistakes you made. Yikes!
I use references for many different reasons. Most of the time, I use them for materials or lighting. When I don’t know how something will look in a certain lighting setup in the “real world,” I try to find a picture of it so I can see how it really looks.
The beginning of a painting can be a lot of fun or be absolute hell and make you doubt everything about yourself and the idea you have set up to create. 🙂 The process varies, but I find it’s always best to start big and go small. I ‘block in’ the shapes, detail a bit of the shapes, and make them more distinguished to get the overall values in place. Then I go smaller and smaller… I try to work out all of the picture at once; this way, you have a higher degree of “control,” understanding where the picture is going to end up, the POV (point of view), and final composition.
In this case, I happen to like the initial illustration. It wasn’t too long before I had some nice values and mood in the picture. I was confident that I could take it all the way through to a satisfying conclusion.
Thomas:
This is a pivotal stage. Now I understand what the picture will look like. Sure . . . a lot of detail is missing—but the mood, lighting, and palette are all there. I may not know how Act 3 ends, but I can see the gist of it!
Rogier:
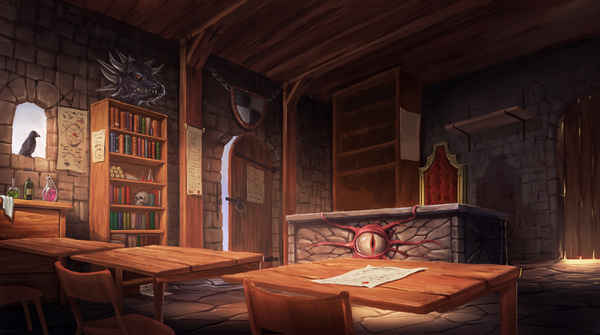
With the first general colors in and approved, pretty much everything is set up. Now is the time for detail work, which I call “rendering” even though I’m doing it by hand 🙂
This is the part where you sort of shut off your brain and just paint away hour after hour. The relaxing part of the job, finally!
I used to not take any breaks while working on a project. That was a (big) mistake. I now understand that taking a break actually speeds things up. Leaving and returning allows me to clearly see what I am actually painting. Surprisingly so, spending hours looking at the same image makes it harder to see. I take a break to avoid the feeling of ‘Oh no, what have I done?!’ – or worse, getting a bunch of revisions from the client.
Since this is all about indie development, it can get tricky because timelines are tight and budgets are tighter. It is better to spread three days’ work over four actual days and do some other little things in between, then to power through. A work of art cannot be rushed!
Here’s a helpful tip: Flip your canvas a lot so that you get a fresh view of your image. When you flip (mirror) your image, it sort of refreshes it in your brain—which helps when looking for mistakes.
Also, zoom out a lot to avoid tuning the mood/feel of the image out with too much detail. Sometimes images can be so detailed that they end up looking dead. Zooming out makes it easier to figure out where the focal point should be, which equals “more detail.” This greatly enhances the overall composition of the painting.
On the other hand, I want viewers to have something to see wherever they look in the image. As they focus in, they discover details they hadn’t noticed at first. This makes the image more engaging to look at. However, preserving the mood and composition is essential. Play with light and atmosphere, and keep detail in check to create a nice balance.
Then it’s time to send the finished work to Thomas again for feedback. It wastes everyone’s time to put lots of detail into an element of the painting only to have it moved or removed due to late revisions.
Thomas:
At this stage, it’s clear to me how the picture will end up. Small revisions may be asked at this point, but we’re way past any big revisions. I generally am very excited to see it coming to life and tell him just to keep going. Due to my excitement, I pretty much bug him every day to see if he is done yet 🙂
Rogier:
Once I get feedback and approval, I go into the final detail phase.
I continue with the detailing and then add some atmosphere while desaturating some of the darker areas. This will tie the whole piece together and give me more control on where I want the viewer to look.
Then I send it off (hopefully!) for final approval.
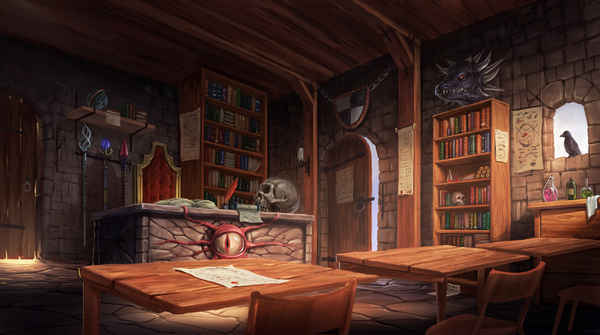
Overall, I’m pleased with how the image turned out. The fact that it’s detailed but never gets boring to look at is something I’m really proud of. When you size it down, the values and composition still work really well—which is also a plus. When up close, nothing feels “un-rendered’; you can always tell what you’re looking at!
Thomas:
I could stare at it all day.
Rogier:
I hope this art walkthrough was helpful! Can’t wait to play the finished game.
Thomas:
Thanks, Rogier!
SDG
Check out Rogier’s Deviant Art portfolio. Feel free to contact him about your project.
You can follow the game I’m working on, Archmage Rises, by joining the newsletter or Facebook page.
Or if you really want to call me out on something, you can tweet me @LordYabo